Aug
5
2013
5
2013
Create your first invoice with Online invoices
From the “Invoices” menu choose “Create Invoice”.
Anatomy of an invoice
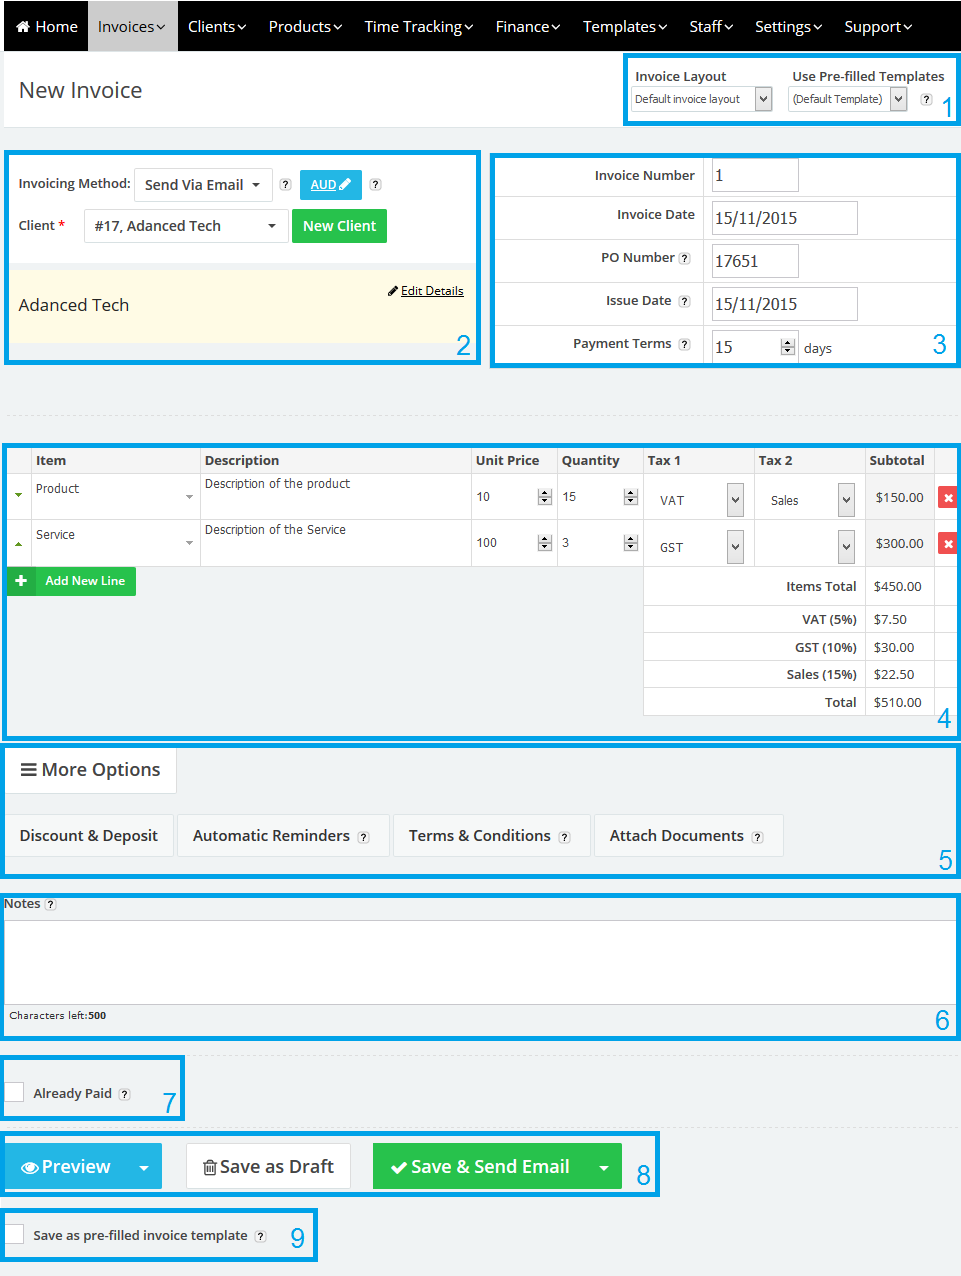
- If you have created pre-filled invoice templates or invoice layout you can choose to apply them from this option:
- Select a pre-filled invoice from your saved “Pre-filled Invoice Templates“, once you choose an option from the drop down menu, it applies directly to the invoice. Pre-filled invoice templates can save you lots of time if you are invoicing the same products often. (Learn How to Create pre-filled invoice template).
- Select an invoice layout from your saved” Invoice Layout” templates once you choose an option from the drop down menu, it applies directly to the invoice. invoice layout templates is used to customize the look and adding custom fields of the invoice e.g. translate the invoice into your local language (Learn How to Create invoice layout template).
- Choose Invoicing method, currency and client.
- Invoicing Method: if you selected “Send Via email,” you will have to enter the client email address. You will able to set client online login details and set automatic email reminders to be sent for unpaid invoices. Additionally the client can pay the invoice online and approve your terms & conditions. If you prefer to print your invoice offline you can choose (Print (offline)) from the invoicing method, you will not be asked to add a client’s email address and you will be responsible for updating the invoice’s status and keep track of the payments.
- Currency: If you wish to use a different currency for this invoice, click the link next to this help icon. Your selection will override your default currency setting.
- Client: Select the client who will be invoiced or create a new client, the client’s data will appear highlighted in yellow where it can reviewed and edited.
- Edit the invoice number, dates, and add payment terms.
- If the issue date is not the same as the day on which you are creating the invoice, enter the issue date here. This is useful where you wish to create an invoice now and send it on a specific date in the future.
- Payment terms: Enter the number of days after which the invoice is due (for example you would enter 14 where the invoice is due 14 days from the issue date).
- Add your Products/Services details.
- Name: Enter the product/service name or choose a per-created product.
- Details: if you want to use only one field for describing your item, leave this field empty for all items and it will not be shown in the invoice
- Unit price: Enter the price for product/service
- Qty: Enter the product Quantities.
- Tax1, Tax2: Add one or more taxes. If the tax field is left blank it will not appear in the invoice.
- Add new line: Add new space for another product or service
- You can add special fields:
- Notes: The text entered here is additional to the product or service descriptions in the main body of the invoice. This allows you to add further details, perhaps relating to delivery, other payment details, or messages relating to special offers.
- Already Paid: Choose this option to mark the invoice as paid e.g. if you are invoicing offline.
you will be prompted for payment method and Ref No.
- After finishing the invoice:
- Preview the invoice in Web view or in PDF format
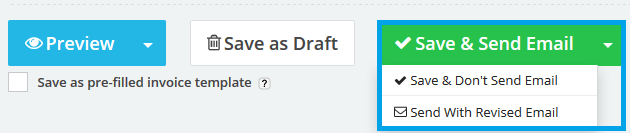
- Save the invoice as Draft
- If you chose “Send Via Email” from the “Invoicing Method” section you will be able to send the invoice to you client’s email be clicking the “Save & Send Email” button.
- To Save the invoice but without sending an email click the “Save as Draft” button or the “Save & Don’t Send Email” button.
- If you wish to edit the subject or the body of the email before sending it to your client or add more more emails to receive the invoice click the “Send with Revised Email” button and you will be directed to a page where you will able to est the subject of the email, the body of the email and add more emails as “CC” or “BCC“.
- If you chose “Print (offline)” from the “Invoicing Method” section you will be able to Save the invoice and print to to invoice your client.

- If the same invoice is being used for many clients, it can be saved as a pre-filled template. This saves creating it again. Check #1 for more info.
Contact us if you have an issue or more Questions.