
Jun
21
2015
21
2015
Creating Recurring Invoices in the Online Invoices System
 An article by Adam

Create a new recurring Invoice:
- From the “Invoices” menu choose “Recurring Invoice”.
- Click the “New Subscription” button.
-
Anatomy of a recurring invoice
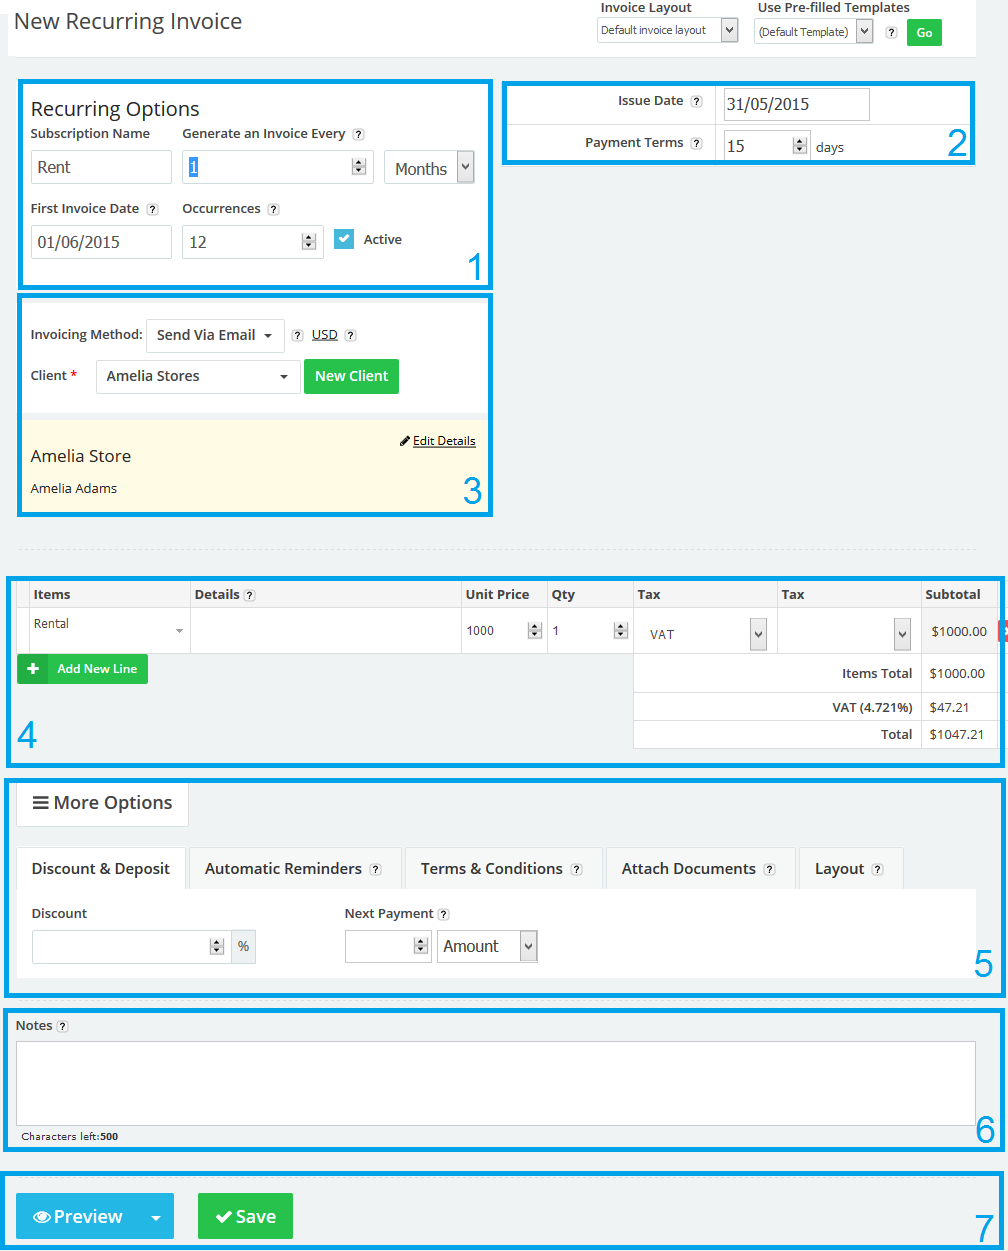
- Set Recurring Options.
- Subscription name: Add the name for the recurring invoice. All generated invoices will fall under this name.
- Generate an invoice every: Enter the period of time the subscription is for (for example select ‘month’ where an invoice needs to be issued on a monthly basis). You can choose from days, weeks, months or years.
- First invoice date: Enter the date of the first subscription renewal invoice – it will automatically be sent on this date with adjusted dates and subscription period, and thereafter at the same time intervals.
- Occurrence: Enter how many renewals there should be – for instance if it is a monthly invoice to cover a 12 month contract, then the number would be 12.
- Other options:
- Issue Date: If the issue date is not the same as the day on which you are creating the invoice, enter a date here. This is useful where you wish to create an invoice and send it on a specific date in the future.
- Payment Terms: Enter the number of days in which the invoice will be due (for example you would enter 14 when the invoice is due 14 days from the issue date).
- Choose invoicing method, currency and client.
- Invoicing Method: if you selected “Send via email,” you will have to enter the client’s email address. You will be able to set the client’s online login details and set automatic email reminders to be sent for unpaid invoices. Additionally the client can pay the invoice online and approve your terms & conditions.
- Currency: If you wish to use a different currency for this invoice, click the link next to this help icon. Your selection will override your default currency setting.
- Client: Select the client who will be invoiced or create a new client, the client’s data will appear highlighted in yellow where it can reviewed and edited.
- Add your product/service details.
- Name: Enter the product/service name or choose a per-created product.
- Details: If you want to use only one field for describing your item, leave this field empty for all items and it will not be shown in the invoice
- Unit price: Enter the price for the product/service
- Qty: Enter the product quantities.
- Tax1, Tax2: Add one or more taxes. If the tax field is left blank it will not appear in the invoice.
- Add new line: Add a new space for another product or service
- You can add special fields:
- Notes: The text entered here is in addition to the product or service descriptions in the main body of the Invoice. This allows you to add further details, perhaps relating to delivery, other payment details, or messages relating to special offers.
- After finishing the invoice:
- Preview the invoice in Web view or in PDF format
- Save the subscription.
Note:
- All generated invoices will be sent to the client associated with the subscription and are shown on the mange invoices page
- From the Manage recurring invoicing page you can track all the generated invoices and their progress of payment and so on.
Contact us if you have an issue or more Questions.
Start using online invoices software now, or try our free invoice maker.
